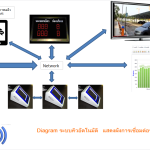
🔥 ฟีเจอร์หลักของ UI
- ลูกค้ากดรับบัตรคิวผ่านมือถือ
- พนักงานเรียกคิวและอัปเดตสถานะ
- แสดงหน้าจอเรียกคิวแบบ Public Display
- รองรับทั้งมือถือและคอมพิวเตอร์ (Responsive Design)
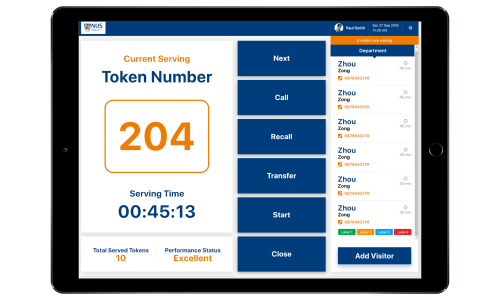
🖼️ ตัวอย่างดีไซน์หน้าจอ
📌 หน้าลูกค้า (รับคิว)
- ปุ่มกด “รับบัตรคิว”
- แสดงหมายเลขคิวปัจจุบัน
- ปรับ UI ให้รองรับมือถือ
📌 หน้าพนักงาน (จัดการคิว)
- รายการคิวที่รอ
- ปุ่ม “เรียกคิว” และ “เสร็จสิ้น”
- แสดงหมายเลขคิวที่กำลังเรียก
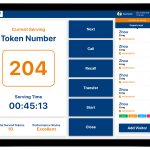
📌 หน้าจอแสดงคิว (Public Display)
- แสดงคิวที่กำลังให้บริการ
- ใช้ตัวอักษรขนาดใหญ่
🎨 ตัวอย่าง Template UI (HTML + Bootstrap)
📌 1. หน้าให้ลูกค้ากดรับบัตรคิว (customer_queue.html)
<!DOCTYPE html>
<html lang="th">
<head>
    <meta charset="UTF-8">
    <meta name="viewport" content="width=device-width, initial-scale=1">
    <title>รับบัตรคิว</title>
    <link rel="stylesheet" href="https://cdn.jsdelivr.net/npm/bootstrap@5.3.0/dist/css/bootstrap.min.css">
</head>
<body class="text-center">

    <div class="container mt-5">
        <h1>รับบัตรคิว</h1>
        <p>กรุณากดปุ่มด้านล่างเพื่อรับบัตรคิวของคุณ</p>
        <button class="btn btn-primary btn-lg" onclick="getQueue()">รับบัตรคิว</button>
        <h2 class="mt-4">หมายเลขคิวของคุณ: <span id="queueNumber">-</span></h2>
    </div>

    <script>
        function getQueue() {
            fetch('get_queue.php')
                .then(response => response.json())
                .then(data => {
                    document.getElementById('queueNumber').innerText = data.queue_number;
                });
        }
    </script>

</body>
</html>
📌 2. หน้าพนักงาน (จัดการคิว staff_queue.html)
<!DOCTYPE html>
<html lang="th">
<head>
    <meta charset="UTF-8">
    <meta name="viewport" content="width=device-width, initial-scale=1">
    <title>จัดการคิว</title>
    <link rel="stylesheet" href="https://cdn.jsdelivr.net/npm/bootstrap@5.3.0/dist/css/bootstrap.min.css">
</head>
<body>

    <div class="container mt-5">
        <h1 class="text-center">จัดการคิวลูกค้า</h1>
        <table class="table table-bordered text-center">
            <thead>
                <tr>
                    <th>หมายเลขคิว</th>
                    <th>สถานะ</th>
                    <th>จัดการ</th>
                </tr>
            </thead>
            <tbody id="queueList">
                <!-- รายการคิวจะแสดงตรงนี้ -->
            </tbody>
        </table>
    </div>

    <script>
        function loadQueue() {
            fetch('queue_list.php')
                .then(response => response.json())
                .then(data => {
                    let queueTable = "";
                    data.forEach(queue => {
                        queueTable += `<tr>
                            <td>${queue.queue_number}</td>
                            <td>${queue.status}</td>
                            <td>
                                <button class="btn btn-success" onclick="callQueue(${queue.id})">เรียกคิว</button>
                                <button class="btn btn-danger" onclick="completeQueue(${queue.id})">เสร็จสิ้น</button>
                            </td>
                        </tr>`;
                    });
                    document.getElementById('queueList').innerHTML = queueTable;
                });
        }

        function callQueue(queueId) {
            fetch(`call_queue.php?queue_id=${queueId}`).then(() => loadQueue());
        }

        function completeQueue(queueId) {
            fetch(`complete_queue.php?queue_id=${queueId}`).then(() => loadQueue());
        }

        setInterval(loadQueue, 5000);
        loadQueue();
    </script>

</body>
</html>
📌 3. หน้าจอเรียกคิว (Public Display display_queue.html)
<!DOCTYPE html>
<html lang="th">
<head>
    <meta charset="UTF-8">
    <meta name="viewport" content="width=device-width, initial-scale=1">
    <title>หน้าจอเรียกคิว</title>
    <link rel="stylesheet" href="https://cdn.jsdelivr.net/npm/bootstrap@5.3.0/dist/css/bootstrap.min.css">
    <style>
        body { text-align: center; background-color: #222; color: white; }
        .queue-number { font-size: 5rem; font-weight: bold; }
    </style>
</head>
<body>

    <div class="container mt-5">
        <h1>คิวที่กำลังให้บริการ</h1>
        <h2 class="queue-number" id="currentQueue">--</h2>
    </div>

    <script>
        function loadCurrentQueue() {
            fetch('current_queue.php')
                .then(response => response.json())
                .then(data => {
                    document.getElementById('currentQueue').innerText = data.queue_number || "--";
                });
        }

        setInterval(loadCurrentQueue, 3000);
        loadCurrentQueue();
    </script>

</body>
</html>
📌 4. ไฟล์ PHP ดึงข้อมูลคิว
📄 queue_list.php (แสดงรายการคิว)
<?php
include 'db.php';
$result = $conn->query("SELECT * FROM queue WHERE status = 'waiting' ORDER BY id ASC");
echo json_encode($result->fetch_all(MYSQLI_ASSOC));
?>
📄 current_queue.php (แสดงคิวที่กำลังให้บริการ)
<?php
include 'db.php';
$result = $conn->query("SELECT * FROM queue WHERE status = 'serving' ORDER BY id DESC LIMIT 1");
$queue = $result->fetch_assoc();
echo json_encode($queue ?: []);
?>
✅ สรุป
🎨 ออกแบบระบบบริหารจัดการคิวที่รองรับมือถือและคอมพิวเตอร์
- หน้าลูกค้า: กดรับบัตรคิวผ่านมือถือ
- หน้าพนักงาน: จัดการคิว (เรียกคิว, เสร็จสิ้น)
- หน้าจอแสดงผล: แสดงคิวที่ให้บริการแบบ Public Display
- ใช้ Bootstrap + JavaScript Fetch API เพื่อดึงข้อมูลอัปเดตแบบเรียลไทม์